Showing posts with label organization. Show all posts

Wednesday, November 7, 2012

Office in a box


Living in the smallish house that we do, and having the majority of our free space consumed by baby paraphernalia, there isn't a lot of space left for things like, say...an office for me. Alright, forget an office, I'd settle for a small desk in a corner. But even that seems near impossible.

No, these days my 'zone' (as my husband likes to call it) is spread out all over the couch in our living room. Laptop, iPhone, notepads, pens, coupons, flyers, lists, notecards...you get the idea.

Here's a visual for you.


I'm constantly piling up my stuff and shoving it out of reach when our little guy is not napping or down for the night. Not exactly pretty or organized.

An 'office in a box' was in order. Something that would keep all my little items contained and organized. It just so happened that this great box was stored away in the basement with my gift wrap supplies. Perfect!


I have been holding onto this box for a few years now, knowing that one day it would come in handy.

I almost tossed it a couple of times, but those handy compartments inside would call out "Keep me! Keep me! I will be useful one day, I promise!"


So I hung onto a it little longer and now, FINALLY, I have found a use for it!

I wanted to update the fun/cheery pattern on the outside to something a little more modern and mature. It would be great to have it match our living room decor since that is where the box will be living.

My plan was to cover it with some pretty Martha Stewart wrapping paper that I scored for a great deal at Michael's craft store a few years ago when they were clearing out her gift wrap line (I stocked up). Then cover with clear Contact shelf liner for durability.

I also found some adhesive metal label plates on clearance at Michael's. Perfect for the outside of my box!


Inside, I wanted to increase the box's usefulness, so I planned to add magnetic stick-on pieces (from the dollar store) and a corkboard (cut out from an Ikea cork hot pad).


So I set to work covering with paper. I didn't do any fancy measuring, just placed the box on a large piece of wrapping paper and cut to size as needed, adhering it to the box with double-sided tape. The corners were a bit tricky, but it all turned out I think.


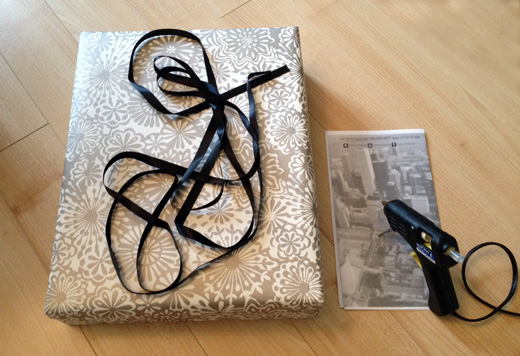
Some black ribbon adds a nice touch around the edge of the lid. I dug in to my scrap ribbon box and brought out the glue gun for this step.


Next, it was time for the Contact paper. Thankfully, it wasn't as tricky as I thought since the adhesive paper is actually somewhat removable. So, when it didn't go on just right, I was able to adjust it without wrecking anything. That made me very happy.

And now... here is the finished box with label plate.


And here's the inside, all ready to be filled up with my office 'stuff'. (I had to add a few more magnetic pieces than originally planned so it was strong enough to hold my magnetic notepad in place.)


Ahhhh, organization. I love it!


And look how pretty it looks on the shelf in our end table beside the couch. The accordion files on top of the box now hold my weekly grocery flyers and coupons.


Much better than the former chaos don't you think?

I'm linking up with these great link parties this week. Be sure to check them out!

Monday, October 29, 2012

Couponing - a whole new world!

So, I didn't share any new posts or projects last week. My apologies.

The reason? Last week I gave less time to blogging and more time to another activity that is new to me - couponing! Don't worry, I won't be trying out for TLC's Extreme Couponing (not any time soon at least).

Source

My husband and I are on a mission to trim our budget, so this is one way to do just that. Thankfully I have some thrifty friends (especially you Rachel!) who can help me learn the ways of becoming a coupon master.

And there is a lot to learn. It's been almost overwhelming at times. But I won't get into that here.

One great thing about couponing is that it is another outlet for me to be organized in a pretty way. I am excited to start a coupon binder or some other organization system. I haven't decided what it will be just yet.

Okay, am I sounding like a complete nerd here? That's alright. I fully embrace my nerdy tendencies.

I hopped on Pinterest to see how others are beautifully organizing their coupons, and I found some great ideas. I thought I would share some of them with you. (If you are going to pin any of these images, please so so from the original source as they are not my images. Thanks!)


I like this box method - especially the patterned dividers.

Source


The aqua pages of this binder caught my eye. When I left Pinterest to check out the original source, I found out they're from Martha Stewart's office line at Staples. Oh Martha, you always get me!

Source

 Love the rainbow colour-coding going on here!

Source

This binder is just so PRETTY and there are lots more great pics of it in the original post.

Source

You can check out my entire pin board of inspiration here. There are so many great ideas out there.

When I get myself organized with a pretty and functional system, I will be sure to share it with you.

In the meantime, tell me, do you coupon? How do you stay organized?

Monday, October 15, 2012

A child's mealtime caddy

I love to organize. It makes me happy inside and out to tackle a project - big or small - and end up with a neater, more functional space.

This project definitely falls into the small category, but small things can make a big difference!


When it comes to meal and snack time, there are a few staples we always need handy for our 10 month old little guy - sippy cup, rice snacks, spoons, wash cloths, to name a few.

Our dining room table was getting a bit cluttered with all of the things we needed to have within reach. I decided to put together a little caddy to keep all of his essentials organized and close at hand.

I bought this great little divided basket at the dollar store for $1.25. It turned out to be the perfect size for what I needed. I love it when that happens.


I wanted to make the basket more personal, so I went digging through my sticker collection and came across these fun, adhesive-backed buttons. I had purchased them on clearance for a mere 70 cents awhile back, but had totally forgotten about them.


I was so pleased to rediscover them - they were perfect for this project!


Once I stuck the buttons on, I went to work filling the caddy with all the essentials.


It's fun, organized and even matches my little guy's place mat!


We just use a booster seat instead of a high chair in order to save space in our dining room. The caddy is the perfect size to fit on the booster seat tray or over the back of his chair when not in use.


Organization. I love it! And all for less than two dollars!

Please visit my Link Parties page and check out where I'm linking up this week.

Tuesday, September 18, 2012

Phone shelf update with vintage jar organizer

We keep our phone, pens, sticky notes and other odds and sods on one of the shelves on our ladder shelf in our eating area off of the kitchen. It was a boring little shelf with our pens et all being held in a tired-looking black desk organizer that I'm sure came from the dollar store eons ago. It had been bothering me for awhile, but I just hadn't gotten around to doing anything about it.

Here are the "before shots".


Notice the black book on the left? That is my address book that has got to be about 15 years old AT LEAST. It is soooo out of date, I'm not even sure why I still have it. As you will soon find out, it DID NOT make it into the update! 


I had this charming vintage, coloured-glass jar that I picked up at a thrift store (you can read about other coloured glass pieces I've collected here).


 I thought it would be PERFECT to store the pens etc. And it is! See?


The wire handle holds the sticky notes just right and the lid works to store my clips. Did you notice the nicely coloured pens in the jar? A re-organized pen jar calls for some fancy pens! I dug them out of my craft area. I will get more use out of them on the shelf here than stuffed away in a drawer in the basement!

Here is the finished shelf (clearly my other shelves now need work).


Did you notice my addition? I wanted to add a little something extra to the shelf besides the phone and a jar for pens. I had some little  vintage books that I'd picked up at a thrift store a long time ago (these were also stuffed away in the basement). They are the perfect size and the red adds a little pop of colour. They are very beautiful OLD books and I think I will have to do another post about them someday soon. One of them is a New Testament from 1921!

In order to make them stand on their own, I fashioned myself some homemade book ends out of a cardboard box I salvaged from the recycle bin.


I cut out one corner of the box and cut it in half lengthwise.


I taped the two pieces together to fit the width of my book stack, and VOILA! The perfect book ends. I hid the cardboard inside the covers of the two end books, so they aren't visible from the front or sides.


What do you think? Was the shelf update a success? I am happy to be putting to use some items that were just sitting around not doing anything.


*My apoligies that my photos aren't the best, it was dark outside when I took these shots so the lighting wasn't the greatest.

Check out my Link ups page to see who I'm linking up with this week!

Thursday, August 4, 2011

Organization is a beautiful thing

I am generally an organized person, but my box of loose ribbon that I regularly dig into when wrapping gifts, was getting seriously out of control.


After wrapping a gift today, I spent some time sorting by colour and placing each group into its own ziplock bag. I'm excited for the next time I have a gift to wrap – it will be a lot easier to see what I have and find the colour I'm looking for!